A long time coming - my fusor update

Current images of fusor efforts, components, etc. Try to continuously update from your name, a current photo using edit function. Title post with your name once only. Change image and text as needed. See first posting for details.
Post Reply
Luca Aldridge
Posts: 91
Joined: Fri Mar 11, 2022 10:21 am
Real name: Luca Aldridge
Location: United Kingdom

A long time coming - my fusor update

Post by Luca Aldridge »

I’m collating previous threads and adding to them here into a comprehensive post of what I’ve done so far.
First and second visits to Justin Fozzard
I first went to Justin with a mightily inadequate idea of what a fusor build looked like and needed.
The second time, I picked up a wealth of stuff:

Some vacuum valves
7674FEB9-41BD-45B5-96E9-20892A90BF65.jpeg
AB0B3073-0BA5-4F60-B842-DDAF52B2A9A8.jpeg
A 7 pin Variac (240V)
2C89FB0B-EA73-416E-81BB-DE3ACE387D08.jpeg
A 240v-30v transformer (shown during testing)
0585DC90-0C98-419E-AA60-56E59D11A038.jpeg
A 30v-25kV transformer
789A893E-3A79-484B-8D63-021716C23DB1.jpeg
An Edwards E2M2 Rotary Vane pump

A 30kV feedthrough
EF68126F-1C24-4B25-99D2-2F259E6ACC9F.jpeg
A CF40 Quartz window
1DFD57D4-B465-45EB-8434-D359F7EFA339.jpeg
A CF Tee (two CF63, two CF40, all non rotatable. It’ll be my chamber.
BD3D9A50-F18E-4277-85C6-9431A481001E.jpeg
An Edwards Diffstak 63 Pump
D78BE040-D924-4030-AD60-FF6088DB48FC.jpeg
Then, onto the E2M2:
Before:
EC92FF71-B0F7-49E8-BBAF-F3049D1A4ED3.jpeg
FE3E0CD3-1E15-4FB7-A94A-70BC37DD4130.jpeg
0DC0624E-A196-4B30-94A4-6FA5ECD00A02.jpeg
Now it’s cleaned up I ran some quick tests with a Pirani gauge I had. It pulled 10e-2 mbar with my jerry rigged seal:
51B890E0-4FB4-48DB-A646-03E58550F8C1.jpeg

Then, the Diffstak:
Both of these had stacks with oil burned onto them, so I took them to a local bead blaster and they were cleaned up:
Before:
A9C06580-6500-4FB9-9EF0-386FB01B8D1F.jpeg
After:
05A6DCC4-DBDF-4A62-A48A-605B97A951F1.jpeg
Now, onto the trolley (Dennis, this one’s for you! ;).
The original one, although looks solid, did move around when wobbled. So, I bought 6M of slotted angle, and some slotted bar. I had some checker plate aluminium so I used that as the main bed, with the 10mm chunky steel plates on each side to help. Lastly, I added angle all round.
90172981-FEF9-4359-B734-CC2988BA7056.jpeg
Please ignore the box of bolts!
I’ll take a minute to explain what’s going where;
In the right most slot will go the top of the diff pump bolted to the left edge and the bit of angle to the right of it
In the second right slot will go the oil box for my transformer.
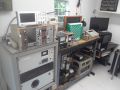
On the left will be the three control boxes for my vacuum system, and on the top will go my variac:
D1B685B3-FCAA-4D1C-A33D-A9A9AFD673C1.jpeg
All three will go along there and the variac on top.
This trolley does not deflect at all under my weight (visibly), neither do the bars on top when I put all my weight on them.

To cool the Difstak I bought a tiny little pump which should do the job. I’ll immerse it in some water and add a bunch of ice for the first proper run, here’s a video to show the flow;
E1C2BD9F-B085-41FE-A3E5-DB9015D65CB8.MOV
(9.67 MiB) Downloaded 191 times
I also bought some parts from Demaco (Based in Holland, fairly cheap, fast delivery to EU, I recommend): Note my trolley being constructed in the background.
D97ECBDA-BFF8-4E47-8746-88E672F968DC.jpeg
This has: CF63-CF40 adapter, CF63-CF40 zero-length adapter, CF40-1/4” Swagelok adapter, 5 of each CF40 & CF63 gaskets

What’s next?
An inlet adapter is on thw way for my pump so I can properly test the entire vacuum system.
Then, the HV components.
Then, assemble it all in my trolley ans test for first plasma
Any questions please feel free to ask.
Luca Aldridge
Attachments
20E4382A-FD6A-44E0-9D76-367F494D2C7A.jpeg
Luca Aldridge
User avatar
Liam David
Posts: 509
Joined: Sat Jan 25, 2014 5:30 pm
Real name: Liam David
Location: Arizona

Re: A long time coming - my fusor update

Post by Liam David »

Looking good. I like the frame: cheap compared to aluminum extrusion but still modular. Keep all the vacuum parts clean, and with a pump+chamber like that, you should be able to pull into the mid e-7 torr with little issue, provided you fix any leaks.
Luca Aldridge
Posts: 91
Joined: Fri Mar 11, 2022 10:21 am
Real name: Luca Aldridge
Location: United Kingdom

Re: A long time coming - my fusor update

Post by Luca Aldridge »

Thanks Liam.
I'm waiting on my final vacuum part and when it arrives I'll commence testing.
Yes, all of my CF stuff looks good for vacuum use, I'll reply to this once I get It all up and running with the vacuums I hit.
Luca Aldridge
User avatar
Dennis P Brown
Posts: 3147
Joined: Sun May 20, 2012 10:46 am
Real name: Dennis Brown

Re: A long time coming - my fusor update

Post by Dennis P Brown »

Like your mobile cart assembly. Good move to add those angled supports.

Do be careful to isolate any/all high voltage (HV) systems (including the UK's wall outlet voltage - much more dangerous than our much lower 120) - maybe have the HV transformer on another insulated platform. Its very important to use properly rated shielded (i.e. grounded) cable for all HV but don't depend on it - I've had shorts thru proper cable and that was to a concrete floor! I isolate/raise and/or add extra insulation for all my HV cable so it never contacts any possible ground point.

Without a cold trap doubt you will do better than 10^-6 torr with an oil diffusion pump but that level of vacuum is over kill anyway. A baffle is all that is needed, however.

I assume you know how to properly tighten copper gasket couplings. Best to follow those procedures to get the best life out of a copper gasket. Of course, don't over tighten them. Best to error slightly of under tightening and do proper leak checking to get the correct level of torque.

If you have access to tap water, a low flow rate is all that pump will require.

Since you have a vacuum gauge, and a high voltage source, do add a voltage and amp meters so you can get to be included in the plasma club.
Luca Aldridge
Posts: 91
Joined: Fri Mar 11, 2022 10:21 am
Real name: Luca Aldridge
Location: United Kingdom

Re: A long time coming - my fusor update

Post by Luca Aldridge »

Hi Dennis,
Sorry it took so long to respond.
Yes, I have two separate ground points, one for the transformer only and one for all 240V stuff.
Yes, I do know and I will follow meticulously to avoid breaking them.
I think that a cold trap is going to be something for me to work towards next year when I go for neutrons.
Further to that, I won’t mess to run the diff pump for plasma so need to cooling (one less thing to worry about)
I’ll see what I can do about the colt and amp meters. I’m not too bothered about getting accepted into the club, as long as I know that I did get plasma. However I’ll see if I can find cheap ones on Amazon.
Luca Aldridge
User avatar
Dennis P Brown
Posts: 3147
Joined: Sun May 20, 2012 10:46 am
Real name: Dennis Brown

Re: A long time coming - my fusor update

Post by Dennis P Brown »

Installing an amp gauge is easy and shouldn't be expensive - very cheap ones work well and see the FAQ's for how to install properly. A voltage meter is more complex and you either make your own voltage divider or buy a high voltage probe for a hand meter
Luca Aldridge
Posts: 91
Joined: Fri Mar 11, 2022 10:21 am
Real name: Luca Aldridge
Location: United Kingdom

Re: A long time coming - my fusor update

Post by Luca Aldridge »

Hi Dennis,
Thanks - I have found what I need on amazon, bot they won't arrive fast enough. I''ll see what my local hardware stores can do.
Luca Aldridge
Post Reply

Return to “Images du Jour”