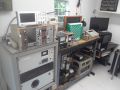
Vacuum System: Easiest to start with the chamber, the most obvious item and work from there. To the left is the viewport and a mirror for safely observing the grid. The ion gauge is mounted in front. To the right is the exhaust valve controller. Behind the exhaust valve controller is the exhaust valve itself, not quite visible. The convection gauge is the black object that is visible. The turbo pump and roughing pump are in the "packaged unit" from Pfeiffer Vacuum.
Gas System: Contained in the black chassis. Electrolysis of deuterium oxide is done in a PEM cell. The box contains a 1.5-3 volt regulated supply, with a 0-3 A meter to monitor the electrolyzer current. Over/Under pressure protection is done with the two vials filled about halfway full of pump oil. A long tube filled with silica gel completes the gas generation system. This implementation is based on Tucker Sandbakken's system described at viewtopic.php?f=6&t=9435 Perhaps unique to my system is the use of a mass flow controller to adjust the rate at which deuterium is admitted to the chamber. The controller is adjustable from 0-10 sccm, although in practice, flow rates below 0.5 sccm are hard to obtain. So far I have operated from 1.5 - 2.5 sccm.
Neutron Detection: The simplest part of the whole setup. A 33 b/mRem BTI bubble detector atop a cardboard box between the view port and ion gauge. The center of the bubble detector is 13.8 cm from the center of the grid.
During each run I attempted to keep the voltage at 35 KV and current at 10 mA by adjusting flow rate and pressure, as well as the HV supply. I did not bring the bubble detector into play until the system was reasonably stable. This often would use half a vial of gas, leaving only the other half for the actual fusion run, but at the lower flow rate, the half vial would last about 20 minutes. I used the handy on line calculator at http://www.gammaspectacular.com/fusion_calculator.html to calculate the isotropic neutron flux.
Data for each run:
First:
Code: Select all
Eg 35 KV
Ig  10 mA
Pressure 6 microns
Flow Rate 1.7 sccm
7 bubbles over 18 minutes.
calculated isotropic neutron flux 13,200 n/s
Second:
Code: Select all
Eg 35-40 KV
Ig  8-12 mA
Pressure 6 microns
Flow Rate 1.5 - 2.0 sccm
4 bubbles over 10 minutes.
calculated isotropic neutron flux 13,500 n/s
Third:
Code: Select all
Eg 35-45 KV
Ig  5-10 mA
Pressure 5-7 microns
Flow Rate 2.0-2.5 sccm
12 bubbles over 8 minutes.
calculated isotropic neutron flux 50,800 n/s
Please note that the pressures listed are uncorrected for the use of deuterium. The manual for my convection gauge did not come with the correction factor for deuterium. I found a correction factor of 0.57 on the 'net' somewhere, but the results did not pass the sanity check. When I get the ion gauge electronics back from the factory warranty repair, I will use the ion gauge (which can be set to read deuterium) to calibrate the convection gauge for deuterium. While I'm waiting for the ion gauge to come back, I will install a video camera and shielding around the view port as the X-ray back scatter while operating at higher voltages is a concern.
I will understand if you wish to wait for more runs with correct pressure readings for deuterium before being added to the neutron club.