Please redirect me if I am not posting in the correct forum.
Some of you may recall that I am a high school teacher and was working with several students to build a demo fusor. We had started with smaller projects, including a small tesla coil, and made a model of the Make Magazine demo fusor. Although it is not an ideal demo fusor in terms of have the borosilicate glass chamber, etc., I felt it offered ease of construction and could be run inside a fume hood in a chemistry classroom. Sadly, the pandemic struck as we were beginning to sort through the parts list. Remote learning threw a huge wrench into our plans. Once teachers were able to enter the school to clean and empty their rooms, I gathered up my tools, items, etc., and brought them home. While helping me unload the car, my 14 year old son started asking questions about the items and for the first time, started showing some interest! So I gave him some research papers about IEC and fusors, which he quickly read. I showed him the plans and the model, and we decided to build it as a father-son project!
I am posting pictures of where we started and some of the work we have done in order to document our progress in the hopes of achieving plasma. For the vacuum, we will be using a Yellow Jacket 93480 which pulls 8 CFM. For power, we will be using a 15kV NST attached to a 0-130V variac. The grid was TIG welded using 1mm SS wire. If we are able to achieve plasma, our next goal would be to work on building a higher grade demo fusor, for which I have already begun gathering some of the SS 2.75” parts when I find good prices.
Since I do not have a chemical fume hood at home, we will likely set up a video camera to a computer that we can watch from behind a door. It has also been suggested that we put a metal “cage” of sorts around the unit. That being the case, should it be grounded?
Thanks for any insight anyone can provide!
Demo Fusor Progress
-
Jim Enright
- Posts: 46
- Joined: Sun Aug 04, 2019 7:12 pm
- Real name: Jim Enright
Demo Fusor Progress
- Attachments
-
-
-
-
-
-
“Whether you think you can, or you think you can't — you're right." Henry Ford
-
Richard Hull

- Moderator
- Posts: 15032
- Joined: Fri Jun 15, 2001 9:44 am
- Real name: Richard Hull
Re: Demo Fusor Progress
The gauge, of course, is no good in the sense it will not read your actual vacuum level. It will serve to tell you if you have a horrific leak, but will not tell you of you actual vacuum level. Talked about here in the FAQs. Based on your device which is more or less the Make magazine version, you probably do not need a proper vacuum gauge. You will have to "eyeball" guesstimate your vacuum level. Good luck with your project.
Richard Hull
Richard Hull
Progress may have been a good thing once, but it just went on too long. - Yogi Berra
Fusion is the energy of the future....and it always will be
The more complex the idea put forward by the poor amateur, the more likely it will never see embodiment
Fusion is the energy of the future....and it always will be
The more complex the idea put forward by the poor amateur, the more likely it will never see embodiment
-
Jim Enright
- Posts: 46
- Joined: Sun Aug 04, 2019 7:12 pm
- Real name: Jim Enright
Re: Demo Fusor Progress
Thanks Richard! I will look further into the FAQ's as to the reason that the gauge will not give an accurate measure of the vacuum. When we construct the demo fusor using the 2.75" SS tee, I would like to have a vacuum gauge that is functional for measurement.
“Whether you think you can, or you think you can't — you're right." Henry Ford
-
Dennis P Brown
- Posts: 3189
- Joined: Sun May 20, 2012 10:46 am
- Real name: Dennis Brown
Re: Demo Fusor Progress
First, nice demo build - very proffessional.
By the way, an accurate vacuum gauge isn't needed for a demo fusor; that analog gauge, while worthless for accurate readings as Richard said, will at least inform you that you have achieved a rough vacuum. The plasma, once ignited and via color, will inform you far better. That should suffice for a demo.
What is/will be your power supply?
You should consider the very clever high voltage meter and current gauges recently featured here by Ed Meserve. More to your specific need he also showed how to build a very nice high vacuum gauge using an micro-amp meter and ebay vacuum sensor unit that can be had for a low price. Very nice system that can be used for a real fusor as well so might be worthwhile to build these various needed (for a fusor) gauges as well now.
See Ed Meserve's posts on how he did that work in general; here it is the first part:
viewtopic.php?f=6&t=13458
and details, here:
viewtopic.php?f=11&t=13474
Very worthwhile read and these gauges are essential for any real fusor. These builds are worth looking at.
As for safety, using window screen should be sufficent protection. Build a frame with screen and make it large enough so that placing it between you and the glass body will offer protection in the rare event that it implodes (sending high velocity glass fragment everywhere.)
-
Jim Enright
- Posts: 46
- Joined: Sun Aug 04, 2019 7:12 pm
- Real name: Jim Enright
Re: Demo Fusor Progress
Hi Dennis, thank you so much for the feedback! We will check out the link that you noted since it is something we can use now as well as when we get to the point of building a functioning fusor. I appreciate you sending me that link! I can definitely see how the plasma would be a better indication of whether there is sufficient vacuum. For the power supply, we are going to use a 15kV NST.
For the safety barrier, I can just build a wooden frame with window screen material and that will be sufficient?
For the safety barrier, I can just build a wooden frame with window screen material and that will be sufficient?
“Whether you think you can, or you think you can't — you're right." Henry Ford
-
Jim Enright
- Posts: 46
- Joined: Sun Aug 04, 2019 7:12 pm
- Real name: Jim Enright
Re: Demo Fusor Progress
Dennis, I reviewed the links you provided, and they contained great information, thank you! It will take some time to absorb the information but looks to be a great plan. We will continue building the demo fusor for now, with the meters project being an important step for us to undertake when we are ready to work on the fusor. Thanks again!
“Whether you think you can, or you think you can't — you're right." Henry Ford
-
Dennis P Brown
- Posts: 3189
- Joined: Sun May 20, 2012 10:46 am
- Real name: Dennis Brown
Re: Demo Fusor Progress
Your both welcome and Ed really did a good job. That is why sharing results here are so useful for everyone.
Yes, a good insect window screen (heavy gauge better) will be sufficient. Frame mounting and make it like a square foot or so in size should provide protection - of course, it should be as close to the unit as reasonable. Safety glasses are also a good idea.
The NST is a safe and effective power supply for a demo fusor.
-
Jim Enright
- Posts: 46
- Joined: Sun Aug 04, 2019 7:12 pm
- Real name: Jim Enright
Re: Demo Fusor Progress
My son and I have continued working on our demo fusor. I hope that replying to my own previous post is the correct way to document our ongoing efforts.
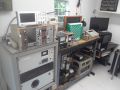
We have purchased a Ritchie Yellow Jacket 2-stage 8 CFM vacuum pump, changed the oil and ran it. We wired a 15kV NST which we will operate with a variac. The rectifier consists of 3 microwave diodes in mineral oil contained within PVC. The inner grid consists of 1mm stainless steel wire TIG welded. The ceramic feedthrough is fixed to the aluminum disc using JB Weld (although I would probably use epoxy next time). We will have to make a safety shield in the event of implosion, but hope to make a first run this weekend! Ultimately, if this demo fusor is successful, we would like to make another one using a stainless steel tee and a viewport to virtually eliminate the implosion potential.
I have attached pictures to document our efforts. We welcome any feedback!
- Attachments
-
-
-
-
-
-
-
-
“Whether you think you can, or you think you can't — you're right." Henry Ford
-
Richard Hull
- Moderator
- Posts: 15032
- Joined: Fri Jun 15, 2001 9:44 am
- Real name: Richard Hull
Re: Demo Fusor Progress
It look good thus far, let us know how it goes when you get it cranked up.
Richard Hull
Richard Hull
Progress may have been a good thing once, but it just went on too long. - Yogi Berra
Fusion is the energy of the future....and it always will be
The more complex the idea put forward by the poor amateur, the more likely it will never see embodiment
Fusion is the energy of the future....and it always will be
The more complex the idea put forward by the poor amateur, the more likely it will never see embodiment
-
Dennis P Brown
- Posts: 3189
- Joined: Sun May 20, 2012 10:46 am
- Real name: Dennis Brown
Re: Demo Fusor Progress
Very nice demo-chamber. I like the classic neon sign transformer (NST.)
Maybe construct a diode circuit for the NST to get negative DC power would be worthwhile; such an exercise also allows one to get more experience with the power supply design.
Keep up the good work; certainly you'll get to the plasma club after you run the system.
A few agressive beginner builders also generate deuterium for use with the demo fusor to get the correct plasma color; in this manner, they also get their deuterium gas supply system constructed & tested for a future fusor system.
-
Rich Feldman

- Posts: 1471
- Joined: Mon Dec 21, 2009 6:59 pm
- Real name: Rich Feldman
- Location: Santa Clara County, CA, USA
Re: Demo Fusor Progress
Another thumbs-up here.
Following on Dennis's suggestion, about plasma color.
The color difference between deuterium and hydrogen is detectable only with high spectral resolution instruments.
So you don't need to buy heavy water or PEM cells.
Preparation of hydrogen gas has been in school chemistry curriculum since 19th century.
viewtopic.php?f=10&t=11204&p=80262
Could also try helium, argon, etc. Would not be the first time those colors were reported here.
Regarding NST output with rectification.
It'd be educational to set it up so you can switch between AC, grid negative, and grid positive.
Does the plasma glow configuration on AC look like the sum of the negative and positive configurations?
If so, can you show that they appear alternately in time? (Practice with a neon glow lamp.)
Last edited by Rich Feldman on Wed Jul 29, 2020 11:02 am, edited 1 time in total.
All models are wrong; some models are useful. -- George Box
-
Jim Enright
- Posts: 46
- Joined: Sun Aug 04, 2019 7:12 pm
- Real name: Jim Enright
Re: Demo Fusor Progress
Thanks Dennis, I appreciate the feedback and ideas! Despite the thickness of the borosilicate cylinder and relatively low vacuum, I am very hesitant to add much else. The idea behind starting off with the glass chamber was so that my son and I could literally see what we were doing and how all of the parts fit together. I have been making purchases of parts (when prices were right) in order for us to assemble a stainless steel vacuum chamber. I am having a blank flange drilled and another one tapped so that we can replicate this demo fusor, but with stainless steel housing. The feedthrough will be secured with epoxy rather than the JB Weld. The stainless steel chamber will not have the analog gauge on top, but rather will connect to a micron gauge running between the hose fitting on the chamber and the vacuum pump. I think it will be a little cleaner that way, and definitely reduce the risk of implosion. Since our ultimate goal is fusion, I really like your idea of beginning to build some of the other components, such as the deuterium set up, so that it can be tested and ready when we get to that point. Here is a picture of the stainless steel parts we have purchased. The flanges with the openings have the glass. The 6-way cross is going to be for the fusor. We have 2 other blanks that are being drilled out for us.
- Attachments
-
“Whether you think you can, or you think you can't — you're right." Henry Ford
-
Dennis P Brown
- Posts: 3189
- Joined: Sun May 20, 2012 10:46 am
- Real name: Dennis Brown
Re: Demo Fusor Progress
Rich's idea on using water in a standard cell is a good idea but if you use a fuel cell, distilled or if possible, de-ionized water is essential for its continued operation.
-
Jim Enright
- Posts: 46
- Joined: Sun Aug 04, 2019 7:12 pm
- Real name: Jim Enright
Re: Demo Fusor Progress
Rich, thanks for the feedback and ideas! I would love to take some time to explore some of the ideas you have proposed and be able to really consider the results! Thanks!
“Whether you think you can, or you think you can't — you're right." Henry Ford
-
Jim Enright
- Posts: 46
- Joined: Sun Aug 04, 2019 7:12 pm
- Real name: Jim Enright
Re: Demo Fusor Progress
Hello everyone, I have been posting updates to the demo fusor project that my son, TJ, and I have been completing. Friday night, we did an initial trial run and I am pleased to say that I consider it to be a success! We built this system using the Make Magazine version so that we could literally see how everything worked together. The vacuum is created using a Ritchie Yellow Jacket 2-stage pump handling 8 CFM. The power is supplied by a 15kV NST that we wired, and is connected to a variac. The inner grid is 1mm stainless steel wire that has been TIG welded. To safely operate the system, we used a “clear” (although a bit cloudy) plastic bin with openings for the vacuum hose and a video camera connected to my computer (the physics book on the bin is to weigh it down). Although we are not creating fusion, I still included our Ludlum geiger counter as a way of instilling safety practices in our work, especially since fusion is ultimately our goal.
For the next iteration of the demo fusor, we will be constructing the chamber using a stainless steel tee with a viewport, and copper tubing for the vacuum hose. The eventual goal is to produce an actual fusor in a stainless steel 6-way cross, but we are trying to take small steps along the road to fusion, buying parts along the way when we find them for a good price, and learning as much as we can as we go.
I have attached several pictures showing our set up and plasma. The pictures of the chamber appear cloudy because they are taken through the plastic bin. I welcome any insight or thoughts!
- Attachments
-
-
-
-
-
-
-
-
“Whether you think you can, or you think you can't — you're right." Henry Ford
-
Richard Hull
- Moderator
- Posts: 15032
- Joined: Fri Jun 15, 2001 9:44 am
- Real name: Richard Hull
Re: Demo Fusor Progress
Great work in a father son project. We like to see this family involvement and support. I have logged you into the plasma club.
Richard Hull
Richard Hull
Progress may have been a good thing once, but it just went on too long. - Yogi Berra
Fusion is the energy of the future....and it always will be
The more complex the idea put forward by the poor amateur, the more likely it will never see embodiment
Fusion is the energy of the future....and it always will be
The more complex the idea put forward by the poor amateur, the more likely it will never see embodiment
-
Jim Enright
- Posts: 46
- Joined: Sun Aug 04, 2019 7:12 pm
- Real name: Jim Enright
Re: Demo Fusor Progress
Thank you Richard, we are very excited about becoming members of the Plasma Club!
“Whether you think you can, or you think you can't — you're right." Henry Ford
-
Dennis P Brown
- Posts: 3189
- Joined: Sun May 20, 2012 10:46 am
- Real name: Dennis Brown
Re: Demo Fusor Progress
Congratulations on your build and entry into the plasma club.
I guess building a proper fusor body is your next step?
I guess building a proper fusor body is your next step?
-
Jim Enright
- Posts: 46
- Joined: Sun Aug 04, 2019 7:12 pm
- Real name: Jim Enright
Re: Demo Fusor Progress
Thanks Dennis! Our plan is to convert the concepts and parts into a stainless steel tee for the chamber. Essentially, we are looking to do the same thing that we did, but with the tee and a viewport in lieu of the borosilicate glass cylinder. We will also eliminate the gauge on the top as it really is not serving any purpose. I would like to run a copper line between the chamber and the vacuum pump with a micron gauge in between. All of the other parts will remain the same. I just am weary to run the demo fusor with the glass chamber, but it definitely helped us to better visualize what was happening. I am scouring ebay and other sites for the parts to eventually make a functioning fusor, and have a 6-way stainless steel cross that we intend to use.
- Attachments
-
“Whether you think you can, or you think you can't — you're right." Henry Ford
-
Dennis P Brown
- Posts: 3189
- Joined: Sun May 20, 2012 10:46 am
- Real name: Dennis Brown
Re: Demo Fusor Progress
Be careful to properly ground the fusor and pump if connected with a metal pipe. I follow the star methodology as outlined in the FAQ. I also use a metal screen over the inlet port to my vacuum gauge to protect it from the plasma discharge (its on a port for the fusor); however, if the gauge is fairly fair down stream or there is a bend in the metal pipe, that wouldn't be necessary.
-
Jim Enright
- Posts: 46
- Joined: Sun Aug 04, 2019 7:12 pm
- Real name: Jim Enright
Re: Demo Fusor Progress
Thank you for the insight Dennis. I searched the FAQ's and was unable to find a reference to "star Methodology", and I do not want to ask about items that are already addressed in the forum. However, if I add flange that has a 45 degree bend, will that address the concern of adding a screen to the inlet port on the vacuum gauge? Also, what is the best way to ground the vacuum pump? Is changing the tube from braided rubber to copper a significant benefit in reducing potential for leaks? I'm assuming that a fully functioning fusor will need the metal plumbing so it would seem like a good time to get that started, but is this line of thinking correct? Thank you!
“Whether you think you can, or you think you can't — you're right." Henry Ford
-
Dennis P Brown
- Posts: 3189
- Joined: Sun May 20, 2012 10:46 am
- Real name: Dennis Brown
Re: Demo Fusor Progress
There is a star grounding FAQ but in essence, it means all electrical equipment is connected via a common and known to be good grounding source.
Here is the relavent FAQ: viewtopic.php?f=29&t=9968&p=75965&hilit ... und#p75965
This was harder to search for than I remember ... .
A few words of caution; the fusor body absoultely must be well grounded and properly connected with a wire and of adequate gauge for the input power( aside: I do a redundant ground on my system.) Also, if one uses an amp gauge setup that uses the fusor ground wire, it must be properly done to ensure that if the amp gauge falls, the fusor isn't then floating at a lethal voltage!
See: viewtopic.php?f=29&t=4266
Of course, the power supply must have the correct grounding system.
Grounding a vacuum pump is trivial (most modern pumps have a three wire plug) but just run a wire from its metal case to your primary ground connection.
Again, I use a wire mesh over my TC inlet port (and that works great) but if one does that, a bend is not needed. But if one wants to avoid a screen or add extra protection for an expensive gauge, then adding a right angle bend would work well. Leaks are a fact of life in vacuum systems and dealing with them is part of the learning curve.
Rubber tubing on the mechanical pump to a diffusion pump or turbo has been used for years and while not great (inability to clean the tubing well, and they out gass more) is both common and compared to metal, rather low cost (the very thick rubber tubing, of course.) I use metal flex (stainless steel bellows type.) I found these cheap when sold used but they can fail and be a devil to find the leak. As for all other connections, KF or copper gaskets are the norm and best (safest) approch for the rest of the fusor vacuum system.
-
Jim Enright
- Posts: 46
- Joined: Sun Aug 04, 2019 7:12 pm
- Real name: Jim Enright
Re: Demo Fusor Progress
Thanks Dennis for providing the link! It makes perfect sense. The diagram was quite helpful to visualize it for me. It seems like it might be best to keep the vacuum hose with the braided rubber. For the fusor, I am thinking that I will run a 45 off the chamber. I have a lot of learning to do before I assemble a fusor, but I continue researching various areas to expand my knowledge, and acquire parts as needed if I find them at the right price. Thank you for your guidance and insight!
“Whether you think you can, or you think you can't — you're right." Henry Ford
-
Dennis P Brown
- Posts: 3189
- Joined: Sun May 20, 2012 10:46 am
- Real name: Dennis Brown
Re: Demo Fusor Progress
Your welcome but the thanks really belong to Richard who did so very much to figure all these critical things out and for making it available to all of us novices (like me.)
-
Richard Hull
- Moderator
- Posts: 15032
- Joined: Fri Jun 15, 2001 9:44 am
- Real name: Richard Hull
Re: Demo Fusor Progress
Looks like you might go the distance, jim, you will need to reclaim your plasma club member ship by the new rules. Looks like you only need a good gauge and a current meter and voltmeter.
Richard Hull
Richard Hull
Progress may have been a good thing once, but it just went on too long. - Yogi Berra
Fusion is the energy of the future....and it always will be
The more complex the idea put forward by the poor amateur, the more likely it will never see embodiment
Fusion is the energy of the future....and it always will be
The more complex the idea put forward by the poor amateur, the more likely it will never see embodiment